
I learned how to do invisible machine applique from Sharon Schamber. Sharon always has a neat twist on most quilting processes, and this one is no exception. As I mentioned in my previous post, I am participating in the creation of the Blue Ridge Parkway's 75th Anniversary Commemorative Quilt, that will hang on permanent display in the Folk Art Center on the parkway. I have a 36" x 16" panel to complete. I decided to make dogwoods, LOTS of dogwoods. I dyed 4 different mottled pinks for the bracts and green for the leaves. Here is the panel so far- all the leaves and bracts are done- I have to make the center of each flower and then embellish with beads, but the "invisible machine applique" part is done.

Panel with all the dogwoods sewn to the background fabric
Step #1
Using applique foundation (available from Sharon Schamber or Ricky Tims- these are my sources, but I'm sure there are additional products out there), trace each element/piece of your design onto the foundation.
Step #2
Cut out each shape, then glue, using Elmer's Washable Glue Sticks, to the wrong side of your chosen fabric

I label each piece (element) so I can match it to my master drawing later when I glue the elements to the background fabric
Step #3
Cut out the fabric with a scant 1/4" seam allowance. It doesn't have to be pretty. You are going to turn this seam allowance under, so it won't show

Here are some of the bracts for flower 14- I labeled each flower with a "P" plus petals/bracts "a-d"
Step #4
Put a generous amount of glue all around the edge of the applique foundation and the seam allowance. The glue is purple, but don't worry- it drys clear!

Step #5
Pinch the seam allowance at the outer edge of the foundation forcing the fabric to wrap around the edge and to the back of the foundation. If you are going around a tight inside curve, clip the fabric ALMOST to the foundation to help ease the fabric without creases or folds. You can also use a set of cuticle sticks (I got a pack of 150 from Sally Beauty Supply for $7) to manipulate the fabric a little at a time. This is what I usually do.

Try to "pinch" pleats with your cuticle sticks as you move around the curves
Step #6
Heat set immediately. Using a dry iron, tap the turned edges from the wrong side first, to set the glue. Then turn the piece so right side of fabric is facing up, and heat set again.

Step #7
Set up your machine as follows:
ZigZag stitch- .9 stitch width; .9 stitch length
Use your #37 foot- quarter inch foot. YES, the zigzag is so small, the movement will fit using this foot!
Needle down position
Monopoly thread in the top; loosen top tension to 2-3. Of course, the setting will vary depending on your machine
Very thin thread in the bobbin, in a gray color. I use Superior Masterpiece "L" style prewound bobbins

My supplies- most are available at quilt/hobby shops with the exception of the applique foundation
Step #8
Using Elmer's washable school glue in the bottle with a glue tip (available at many quilt shops, hobby/craft stores) run a bead of glue around the edge of the wrong side of the piece. Place on your background fabric and heat set immediately.
CAUTION! think through the entire design, because you want to glue down and then applique down the pieces that will be tucked under any other pieces first. This can get confusing if you have a lot of overlapping, so take your time.

These glue tips come in a package of 3 different sizes.
Step #9
Starting at the right side of your element, take a few stitches, then back-stitch to lock in. Then continue sewing the piece to the background SLOWLY! so you can hit the element, then the background, then the element, then the background. You will have to stop often to shift your fabric to stay on that edge. When you get to an outside curve or edge STOP and PIVOT your fabric, then continue on your merry way. With a little practice, a novice can master this process quite quickly (I did!).
When you get to the other end of the element, take a few back-stitches and smile- you are done-
now wasn't that easy!

Notice that I've traveled from the right edge, around the heart-like shape of the bract, and will finish at the other edge
After all your elements have been appliqued down, you can do thread play, quilt, etc. Because the applique foundation is hidden between the background fabric and the elements, you don't need additional stabilizer to do thread play.

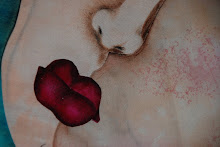
Here are 2 completed flowers (without their centers)- notice that there is overlapping, so I first glued, then stitched those pieces down first, then glued and stitched the overlapping pieces second
You can leave the applique foundation there forever OR, if you wash your quilt, it will disintegrate into fibers into your fabric. Ricky Tims product doesn't disintegrate like Sharon's.
I hope you enjoyed this tutorial. It is my first attempt at one!


Very nice! That's exactly what I remember... now to only find time! Hope all's well -- Miss you!!!
ReplyDeleteHey Karen!
ReplyDeleteI know what you mean.
Miss you too!!
Amy
Very nice tutorial! Hope I can find it when I want to try it!!! (not even sure which blogs led to your blog, but I like what you do!) Sending a smile, Chris
ReplyDeletetrès joli! Beau travail Merci de ce partage
ReplyDelete